Just finished my latest chair project! Exposed webbing??? Yes please ❤ It turned out better …
deconstructed chair project
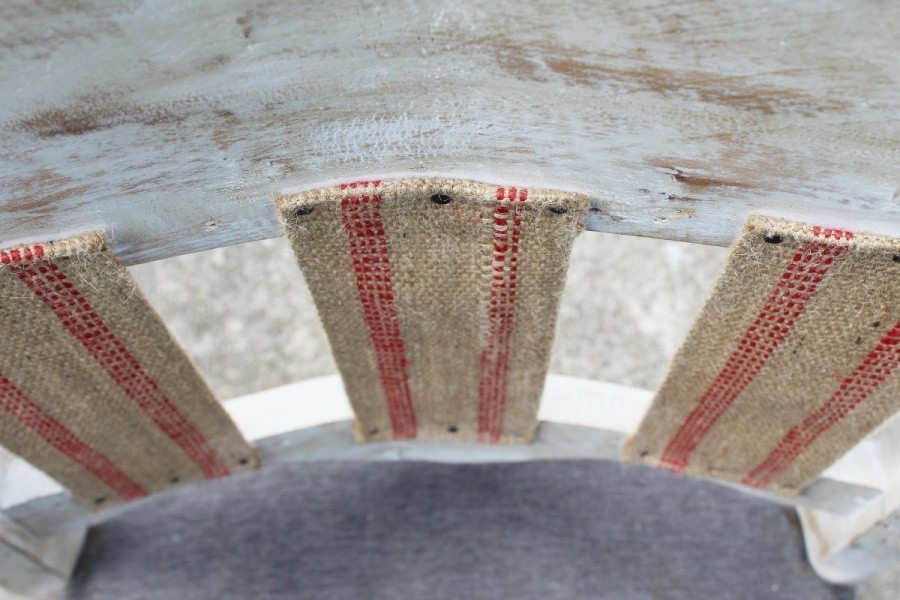
Just finished my latest chair project! Exposed webbing??? Yes please ❤ It turned out better …
I’m spending one of my last days working out here in my summer office. It’s getting cold. The leaves are starting to change ever so slowly. Before long my little space heater won’t be able to keep up with the cold that creeps thru these un-insulated walls and old single pane windows. I’m going to miss all this light and inspiration. {sigh……}
Last spring I moved my office out into our 3 seasons room. Like most things I do, it was done on a whim in the middle of doing dishes or folding clothes. It wasn’t planned. I got an idea and started dragging furniture around. And that’s what I love most about it. At that point, I had a big shaggy rug a friend had given me, an old desk from yet another friend, a broken folding chair I used as my desk chair, and my computer. And then over the summer, as I sat and dreamed and worked in this new space, the room slowly became something fabulous.
I found an old table at a resale shop that I bought thinking one day we’ll have a dining room…until then, it’s my space to sketch and pile things. Then I scored hand me down sofas. One of which now sits across my desk. It’s the perfect place for the hubby or kids to plop down and stare at me. And believe me, the kids pile on that thing regularly and beg me to stop working. {ha}
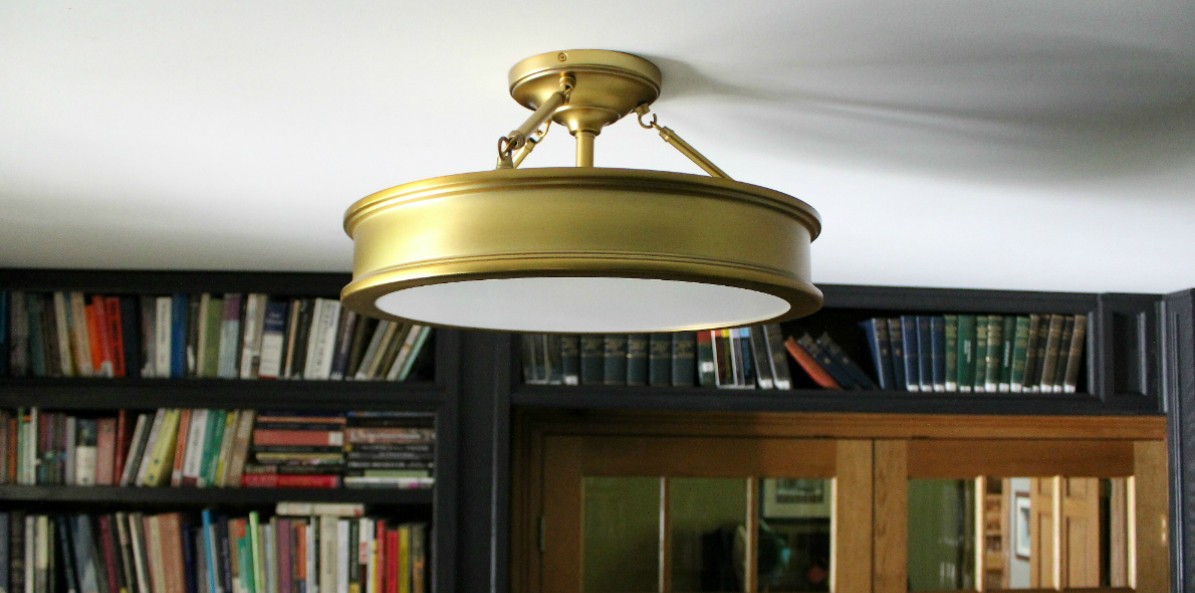
It may not be the “normal” office set up, but I think that’s what makes it so fabulous. It’s ours. It’s what works for us, and it came together thru hand-me-downs and garage sales and my quirky design on a whim ideas. The two light fixtures are both from garage sales, one $2, the other $20. The wing back chair is from Craigslist. Also only $20. I bought it planning to paint the fabric, but have since fell in love with the soft pink. I did end up painting the legs white, and it might be my most favorite piece of furniture in this whole house. The only new items in this office are the pillows and throws, and I bought those at Tuesday Morning (another cheap-o discount type store).
I share the prices of these finds just in case you look at these pictures and see $$$…like I spent a lot of money. The most I spent was on the table, it was $120…but totally worth it.
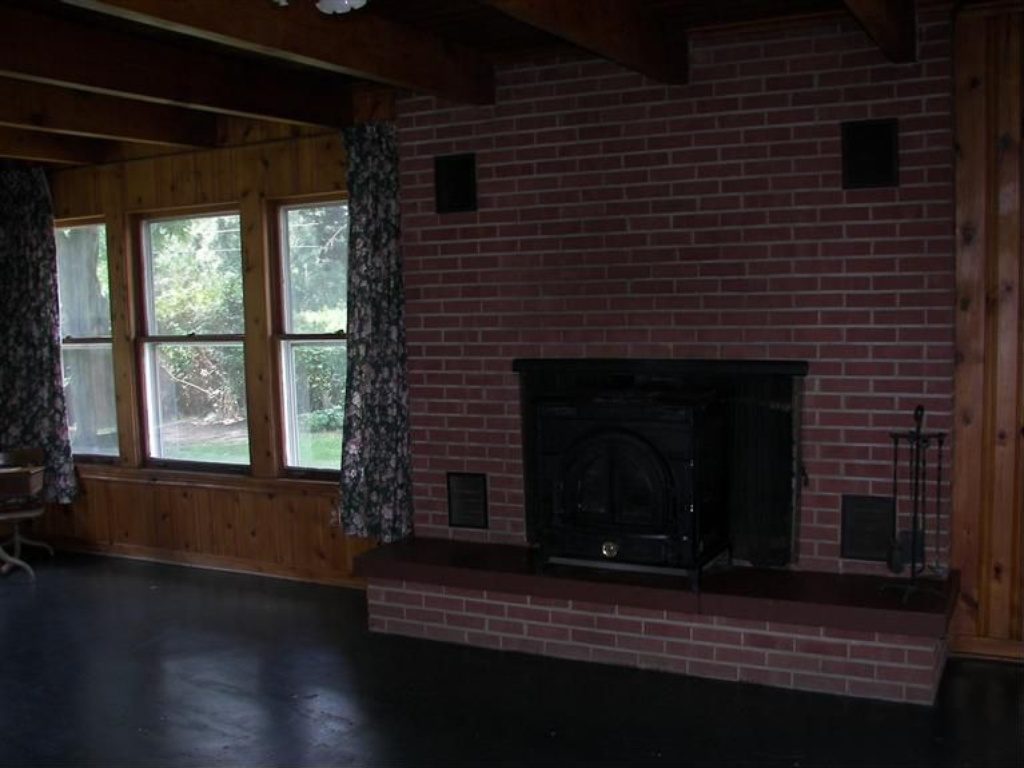
This is the 3 Seasons Room when we first moved in. I have dreams of painting the fireplace and the paneling (of course). And those drapes…they came with the house when we bought it 🙂

I’m embarrased to say that THIS is what the space looked like before it became my office. What a mess!

This is the room the day I moved my desk in and started using this space as my office. It was clearly still a work in progress at this point. My desk chair was an old broken folding chair…

My craigslist wing back chair BEFORE
**it might scream nursing home but just wait**

My craigslist wing back chair AFTER
**just painted the legs and added some pillow bling**
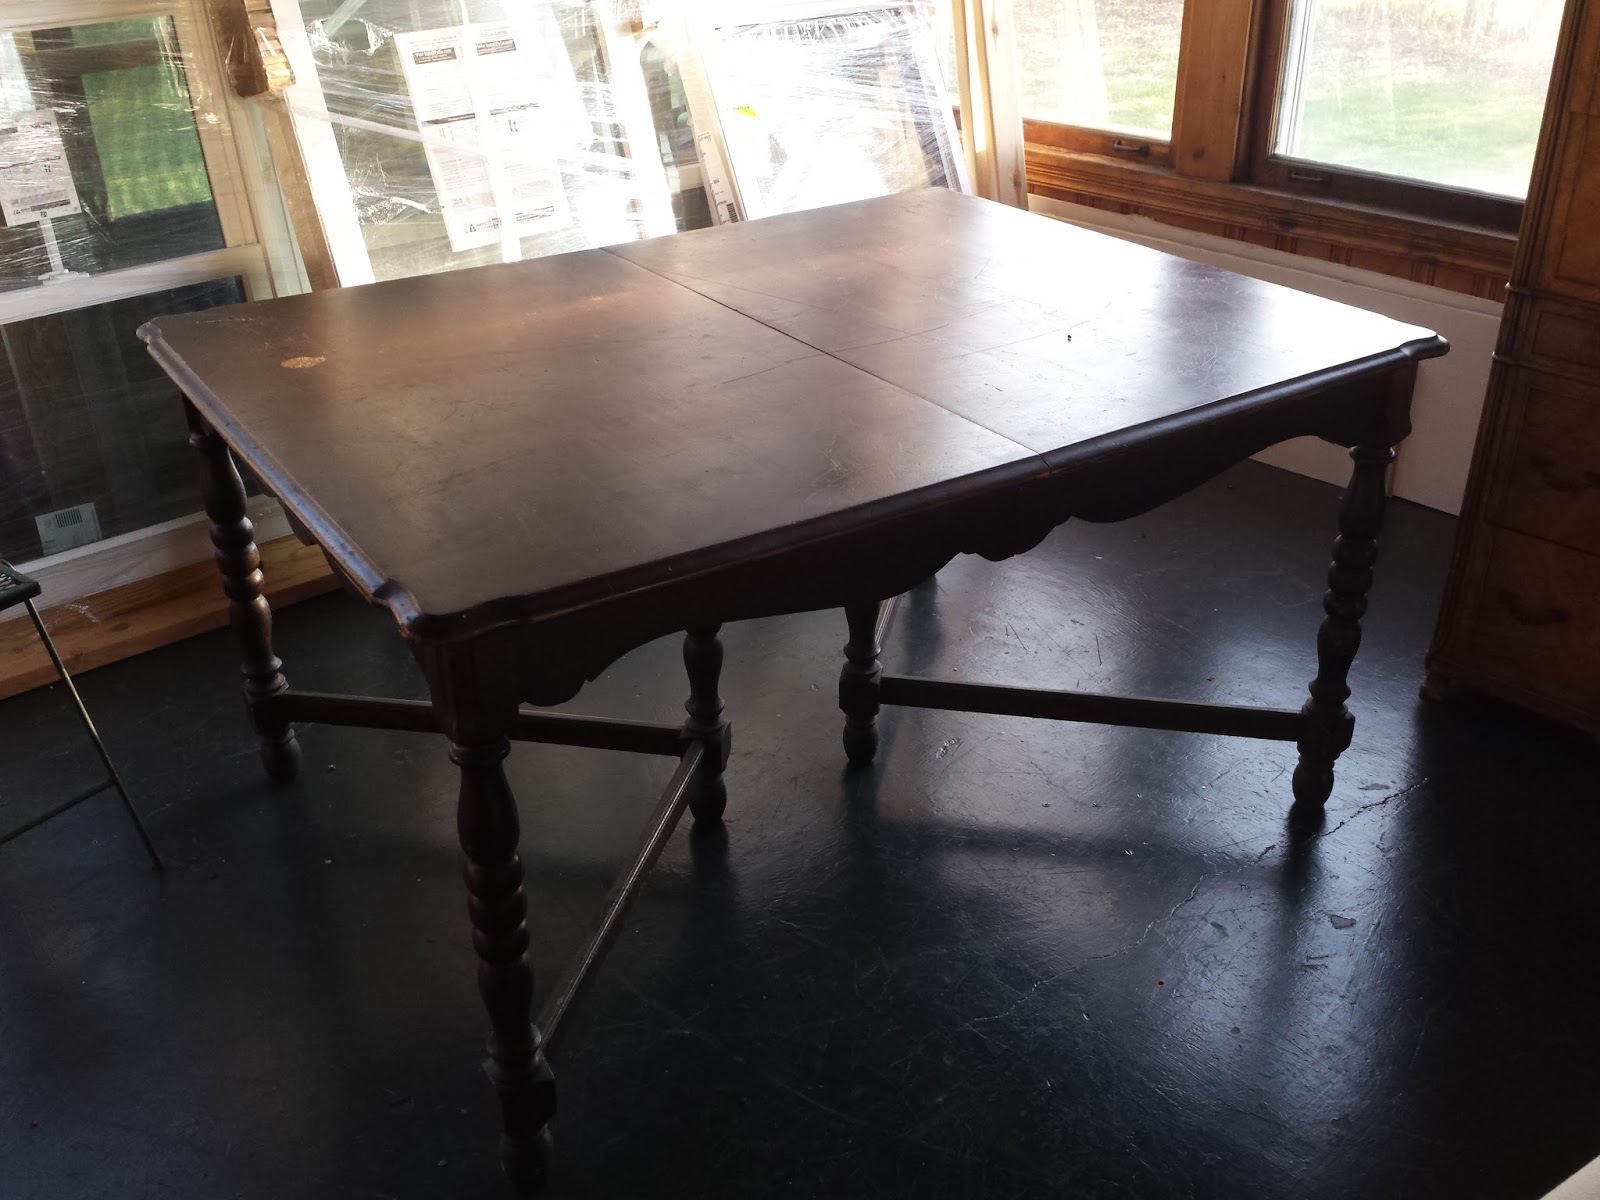
the dining room table I’m using as a desk. i just looooove it.
It seems pointless perhaps…to do the work of moving furniture and styling a room only to get to enjoy it for a season. But it’s refreshing for me in so many ways. I think sometimes we need to look at our work from a new angle to get new and refreshing ideas. I was actually introduced to this concept at a design seminar years ago (at Steelcase, I think). They told us that if we were stuck on an idea, that our brain could dig deeper and reach into other untapped areas for stimuli if we introduced it to a new environment while designing. The basic message was…step away from your desk, your conference table, whatever… and go draw and sketch and design in a different place altogether. Not one your brain is used to. And preferably NOT at a desk. ? It’s probably one of the best little nuggets of wisdom I’ve came across as far as designing goes. I can’t tell you how many rooms and spaces have come together while sketching in my yard on a blanket.
Switching spaces and moving rooms is like therapy for my design soul. As much as I love what this office has become out here…I’m looking forward to a new view to keep the creativity brewing.
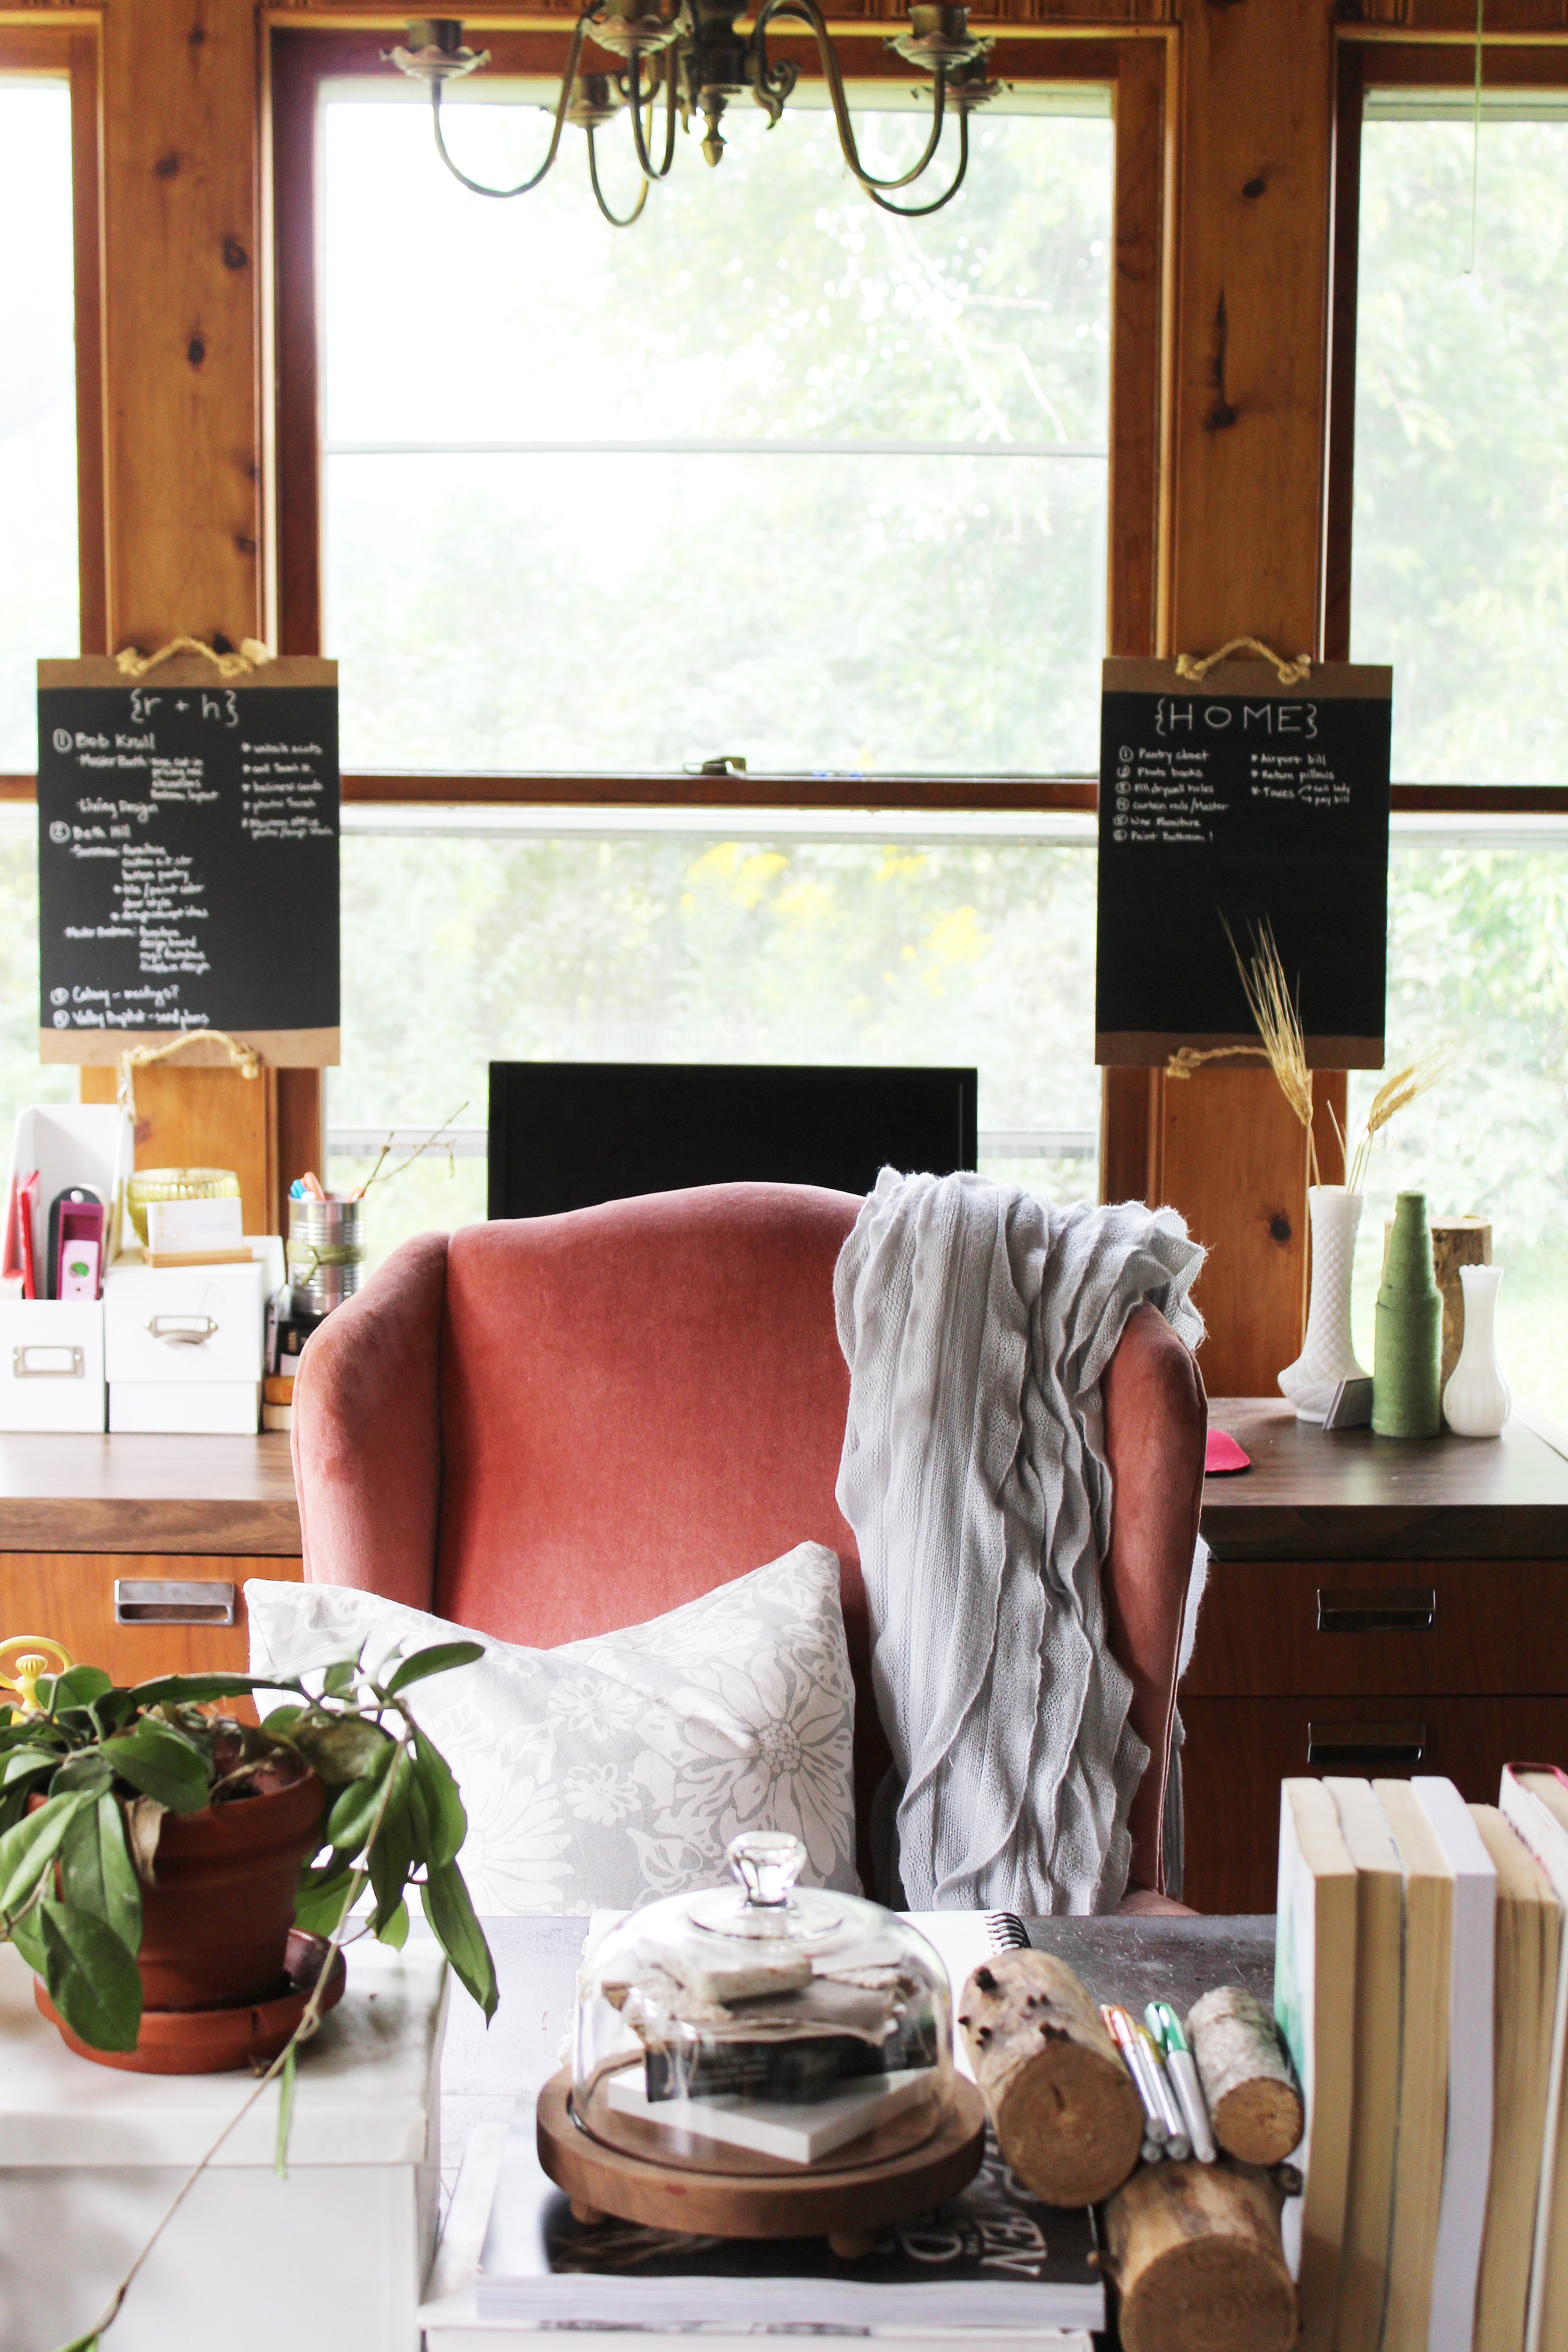
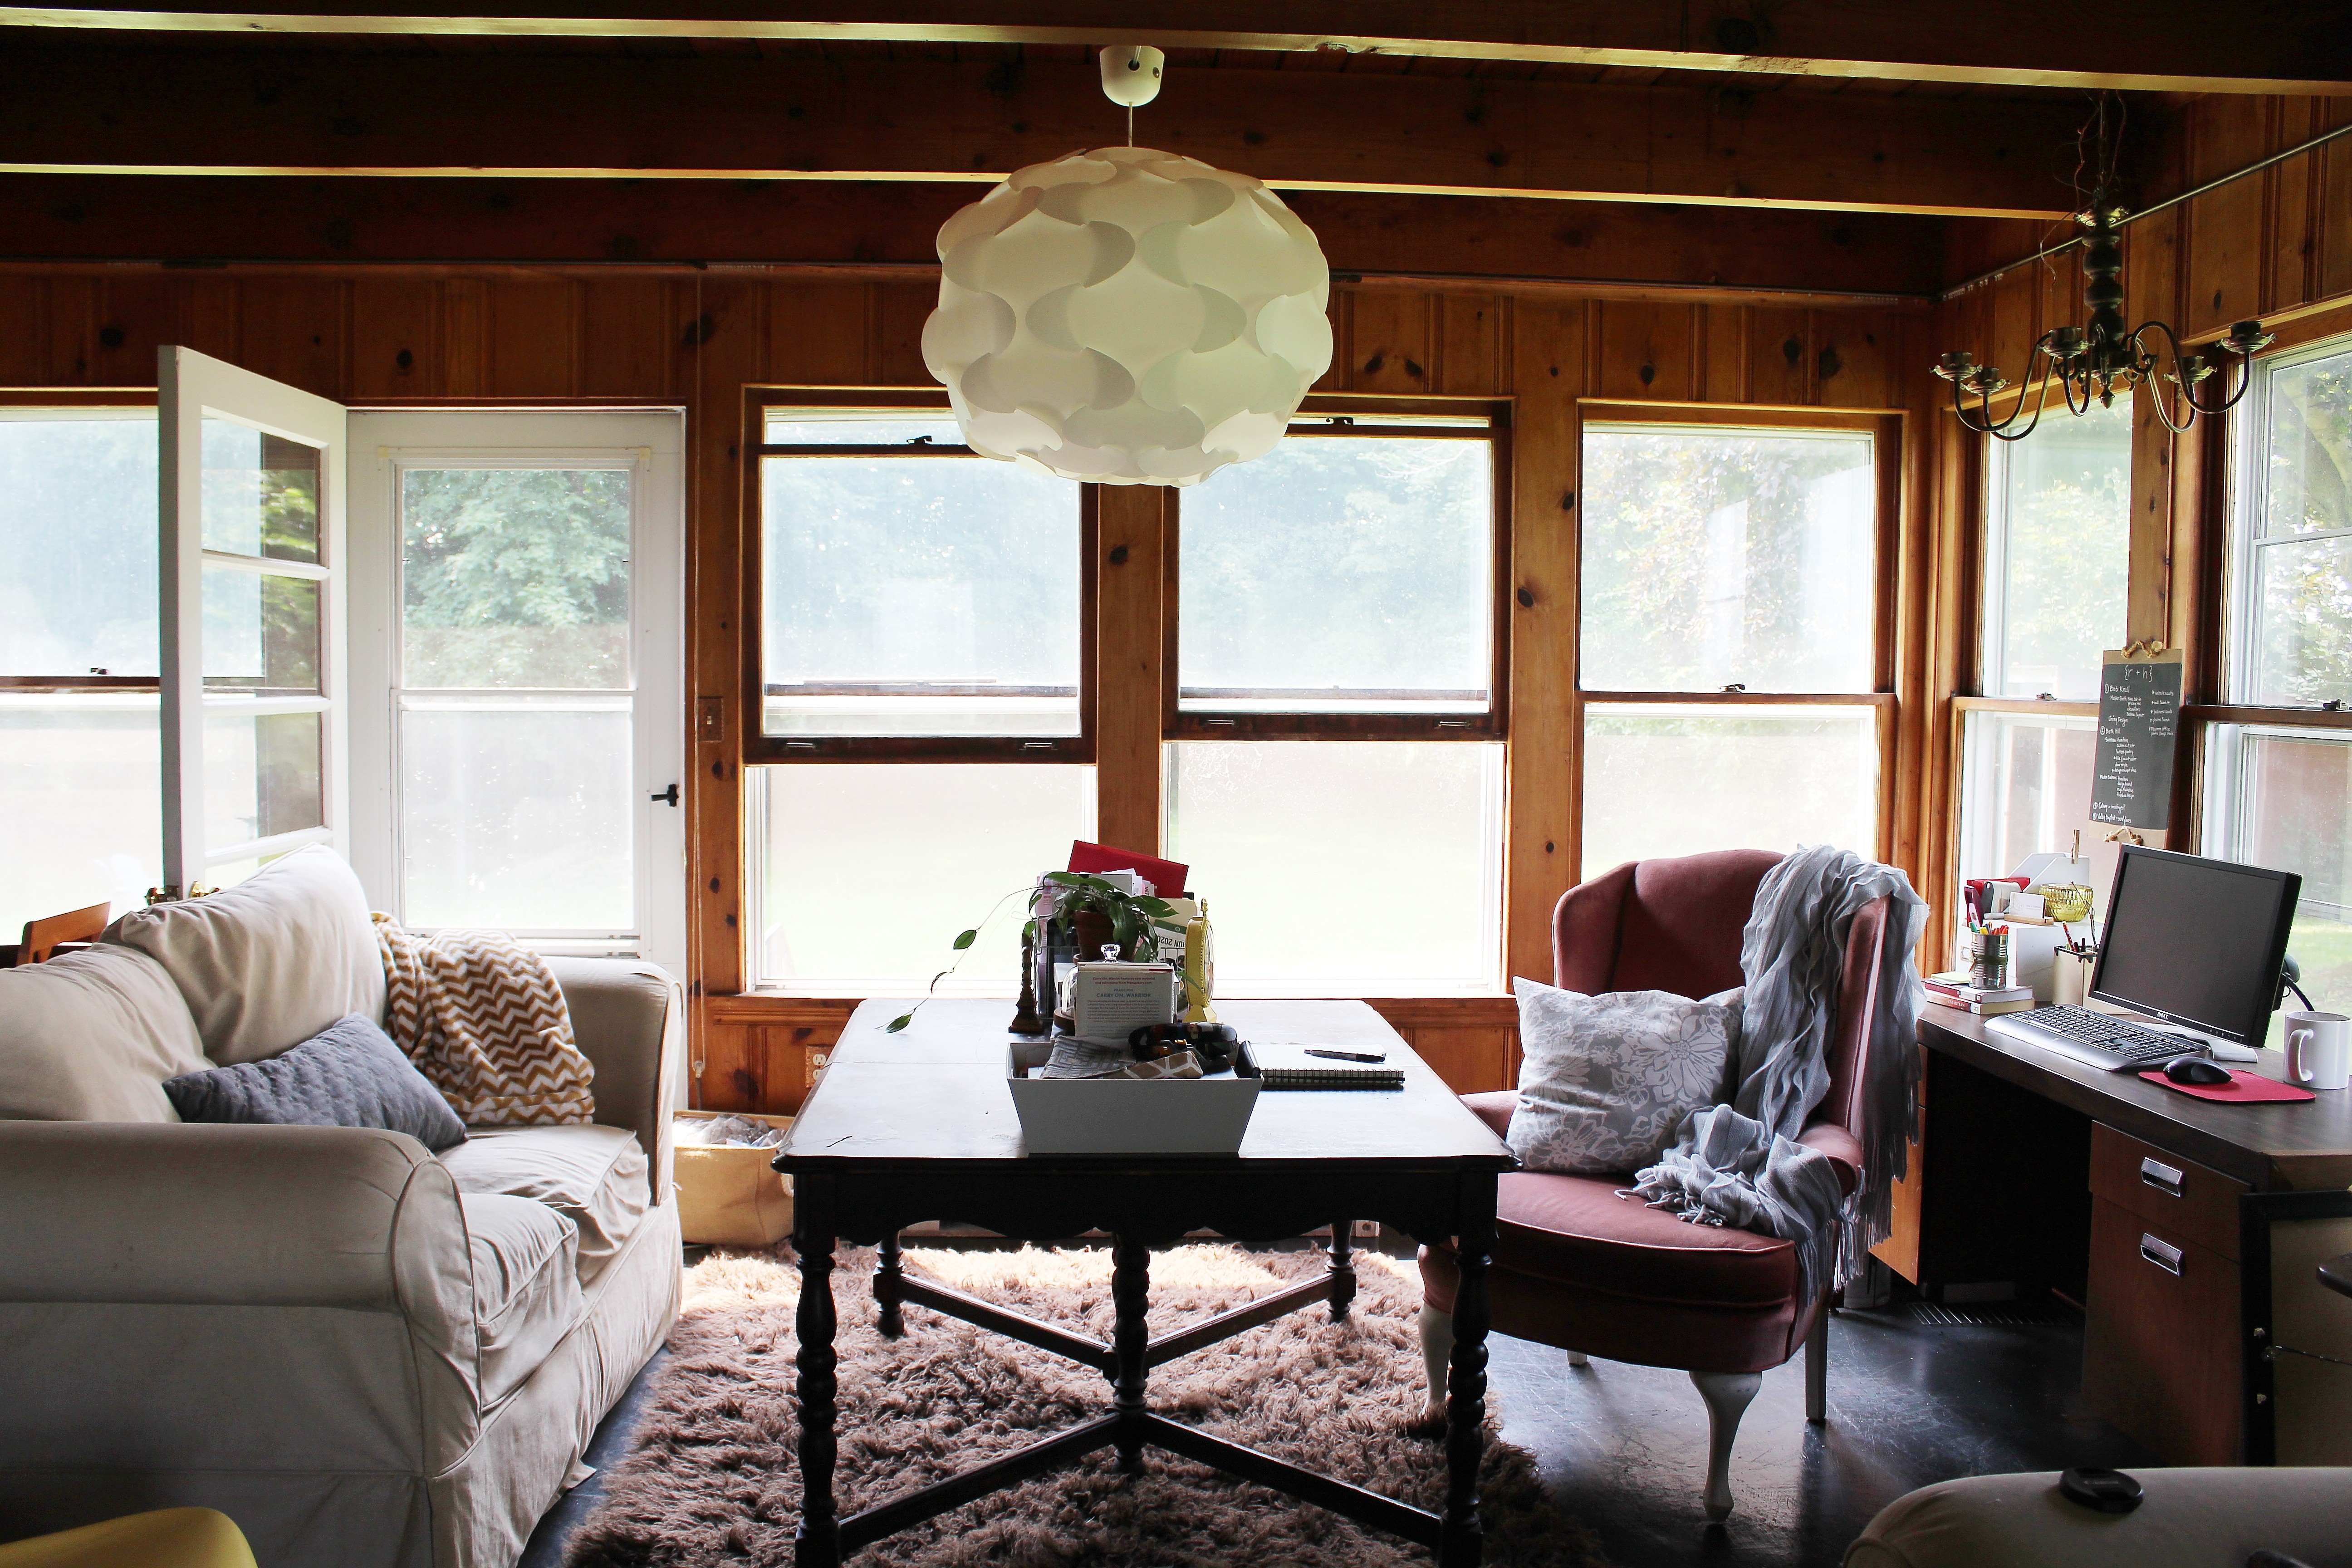
Here are some more photos of my dreamy hand-me-down summer office 🙂

a glued together acanthus leaf. why not?
i got this at a design swap {for free}.

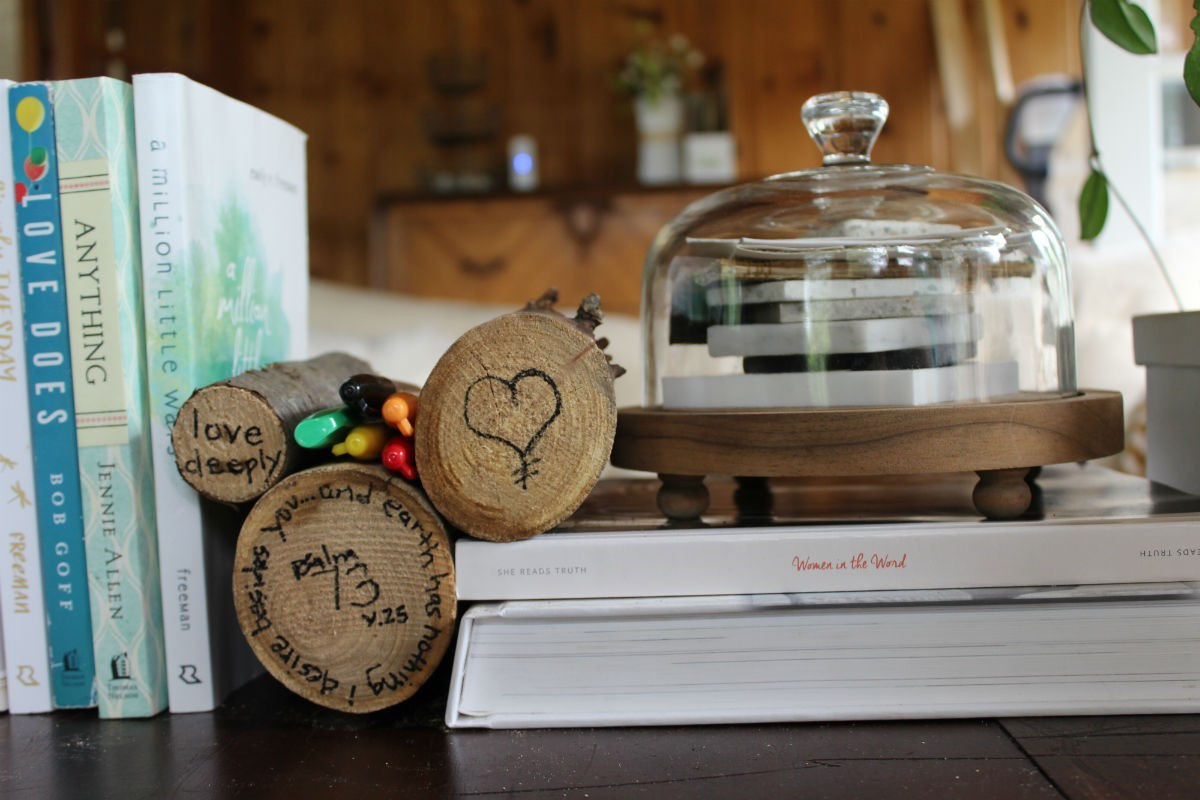
my favorite books, sharpies, wood chunks I drew on, and a glass cloche from a garage sale. design doesn’t have to be expensive.

my desk is never this clean, i promise.
the clock is from meijer! and the white box and bin are from target. i borrowed these items from other rooms in my house…which is a great way to re-think a room my friends. grab items from other rooms and they might just come alive in your new space. oh, and the wire bin is another garage sale find.

here is the other sofa in my make-shift office.
this is where kids climb and read and color and snack.

or where they wear one shoe and their sister’s skirt around their neck. but whatever. good times and snacks are had in this room while Momma works.


cans and twigs and stacks of books.
ALWAYS.

my table top decor consists of chunks of wood, a beer bottle with yarn glued to it and white milk vases from Goodwill.

i made 50 or so of these “trays” you see hanging here for my sister-in-laws baby shower.{we used them to serve soup on…so cute} but now I’ve added some chalk paint and use them as message boards in my office.

and finally, find a way to incorporate art. it can be art you make…and it doesn’t have to be perfect! or hung on a wall either. it adds a little whimsy and meaning to your space.
Is my office perfect? No way. But it’s coming together, slowly…just like so many of the good things in life do.
🙂

It’s Wednesday and the baby’s sleeping. The kids are at school. The floors are swept and things are tidy-ed up around here. There are a ba-jillion things that I should be doing. Like painting things or folding and washing things or the dreaded paying of things…but I’ve decided to chuck those ideas and do what I want. ! Which is, of course, posting about the office project I just finished. Woot!
This is the kind of day that sets my soul free, my friends. Clean floors and the final check mark in my brain marking a project complete by showing it to the world. Or to the ten people that read my blog. But whatever, let’s do this thing!!!
I have a dear friend who is always helping people out. It’s one of her many gifts…being able and willing to step in and make a list, cut thru the crap and get the job done when she sees a friend in need. Sometimes it’s a stack of laundry that needs folded, other times she’s buying plane tickets or concert tickets or helping a friend shop for a trip. But this time the friend was our Pastor. The need was his home office. And since another God given gift of hers is styling, she was all over it. I’m tellin’ ya, the girl could make a broom closet look like a spot you’d want to sit and read in…{no joke}. So how did I get involved? I got on my knees and begged her to let me help, lol. I sort of have this crazy, teary love for our Pastor after the way he loved on us and supported us when Derek got sick. So I jumped at the chance to get involved. And this little act of service sort of had my name written all over it. Home office? Yes, please 🙂
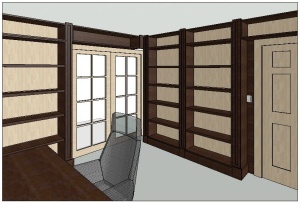
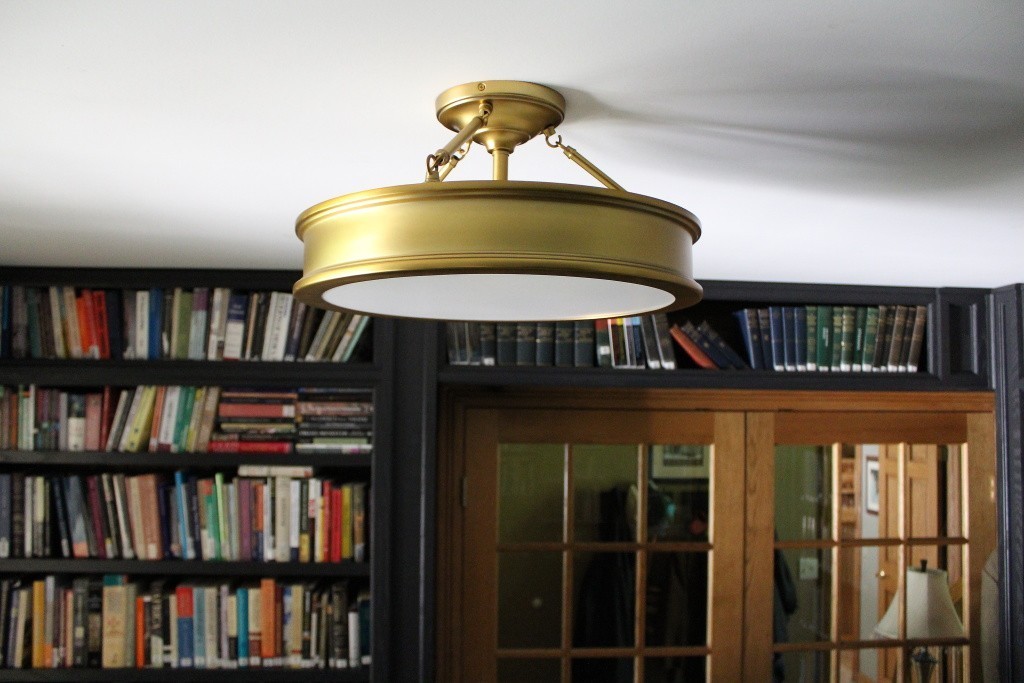
The scope of the project was basically to take our Pastor’s ordinary home office and make it a cozy and functional place for him to work. We also had the help of an amazing craftsman from our church…Jonny Roetker. Check him out on Instagram !!! He’s truly gifted in woodworking, as you’ll see in the “after” photos of this post.
Here are a few before photos:


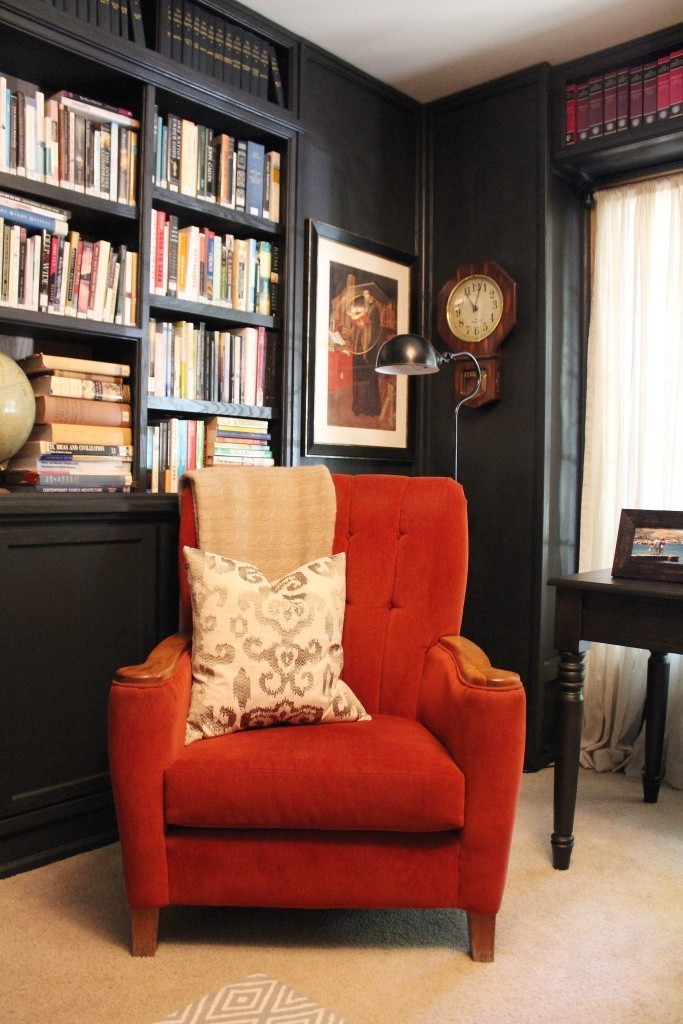
After some discussion, we realized what we were really getting the opportunity to do. We were crafting the space where a man, our Pastor, would be living out his calling of leading and shepherding hearts. What an opportunity. Somehow we wanted it to be more than bookcases and paint and furniture. ? We wanted it to be a retreat almost. Not just a place he could sit and read and work, but a place that would take him somewhere. Where he could sink into a chair and dream a bit and breath.
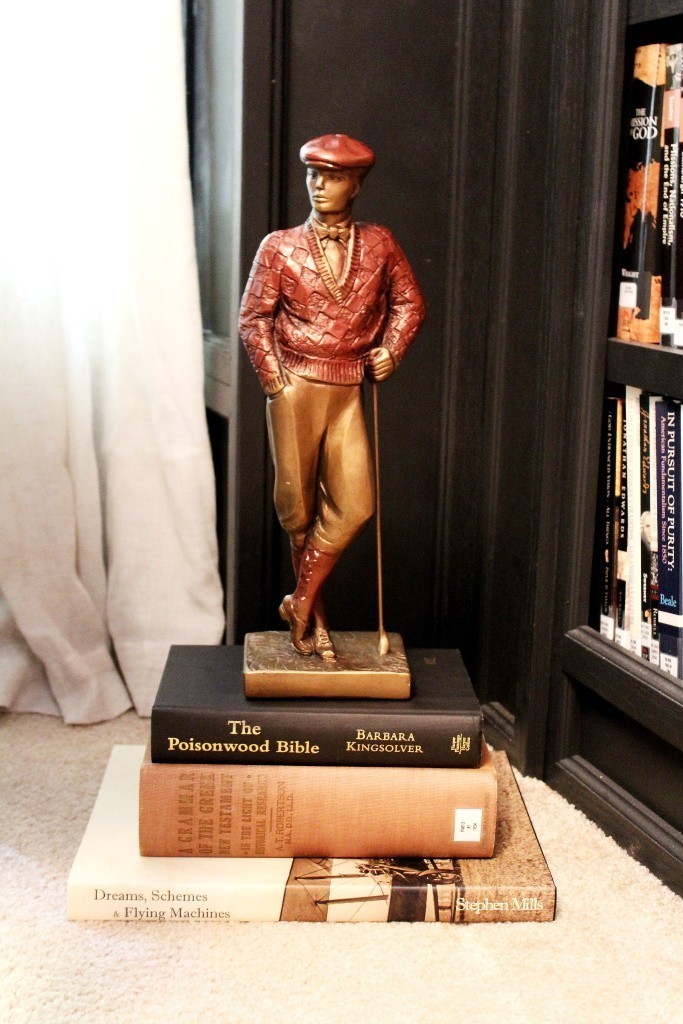
So we started with his style. What Pastor Lionel loves, besides his lovely sweet wife. The man bleeds books and history and old world things. Did I mention he loves books…lol? So we came up with a plan to make the room into the coziest little English feeling library / den imaginable.
To get a better feel for the space we snuck into his office while he and his wife were out of town…and by “snuck” I totally mean we had permission {of course}. !!! But still, even with that, it’s a little weird to be tiptoeing around your Pastor’s house when he’s not there. So Lyn and I decided to make ourselves known and took a selfie and sent it to him. Ha!

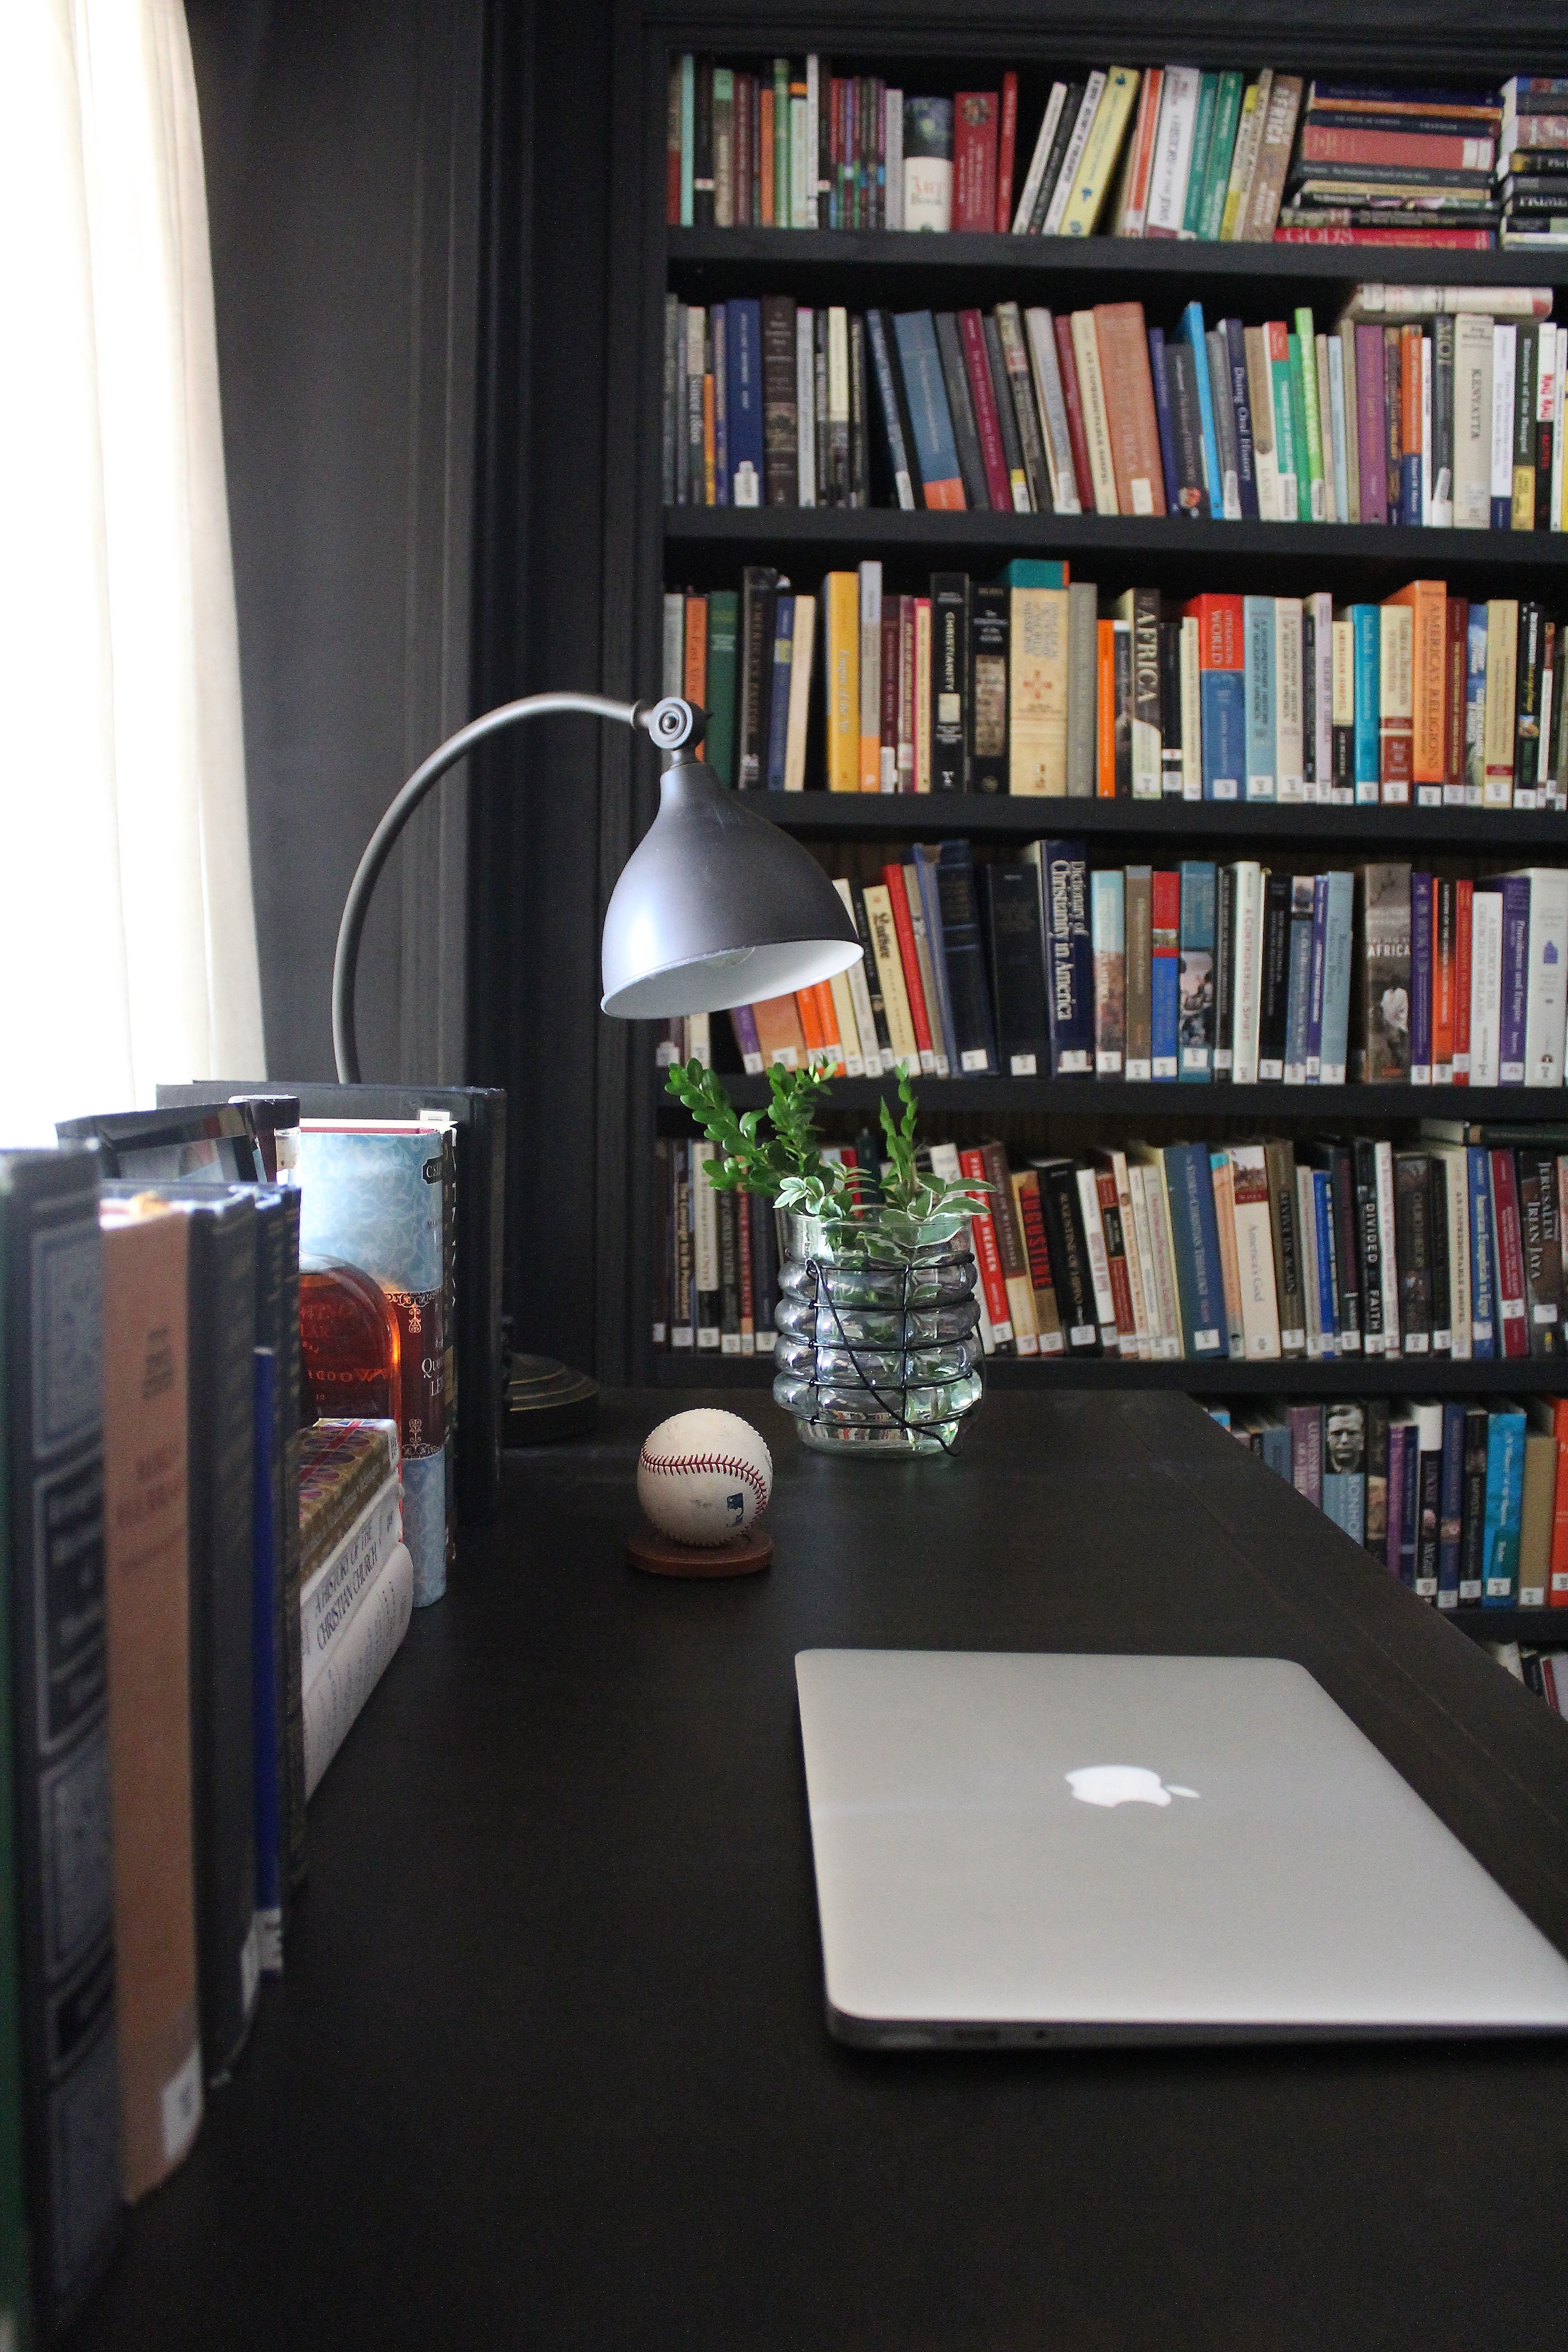
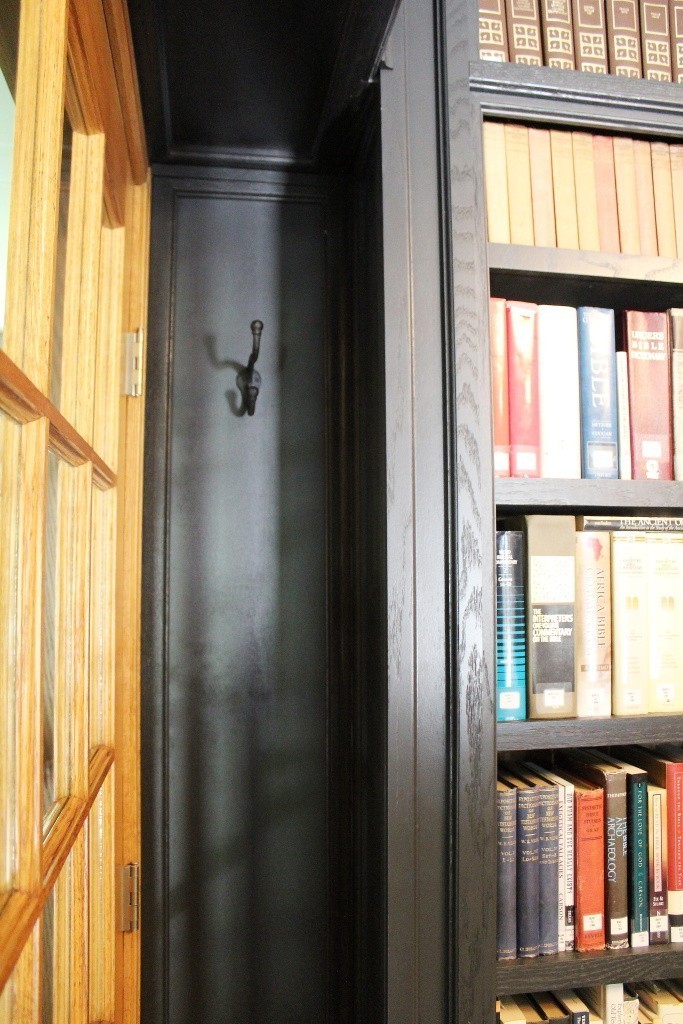
Did I mention the man has a lot of books? And by a lot, I mean the man is more than well armed. He has an arsenal of history and literature and wisdom at his fingertips. We needed to get these little nuggets of wisdom within reach…but the room was small. It couldn’t handle much furniture, if any. So we came up with the idea to build in storage wherever possible. Above the windows, above the doors, along the walls, and even rework the existing shelving a bit to make it all flow.
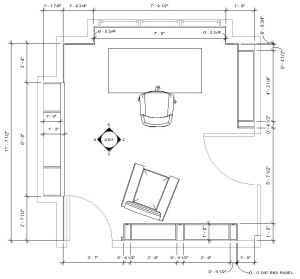
The plan:
We were also dealing with all existing honey oak for the doors, windows, and base. And not that that’s bad in any way, but it’s just not ideal. It’s definitely not my first choice or what I start off wanting to build into a space. We talked about painting it, replacing it, re-staining it. In the end, we decided to go with a two tone wood look, leaving all the existing oak as is, and painting all the new bookcases a dark charcoal gray/black. We tied the two finishes together by using the honey oak as the back to each of the bookcases we added in.
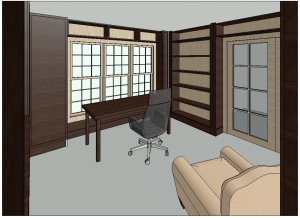
Lyn worked out all the details and styled the room. The desk, the curtains, the rug…all of the pretty stuff you see below. We had more than a few conversations about the deep orange chair you see below too. I hinted to it on Instagram that it was somewhat of an eyesore (mostly because it’s an older style and a bold color), and we weren’t sure it would even work in the room. And it definitely did not look right in his old office. Not one bit. The orange fabric and light wood made it disappear into the land of honey stained oak. And it’s funny to me now, because it almost looks like we designed the room around this chair, if not FOR it. It belonged to a beloved man from our church who left us for heaven not too long ago. He left behind a legacy of sorts with this orange chair. I’ve heard it’s the one he would sit and read and pray in. What a blessing that it now adorns our Pastor’s office.
The after:
Which turned out beautiful by the way. We’re still on the look out for an ottoman for the space…but we were over anxious and couldn’t wait for that piece to take the pictures.
From my instagram…
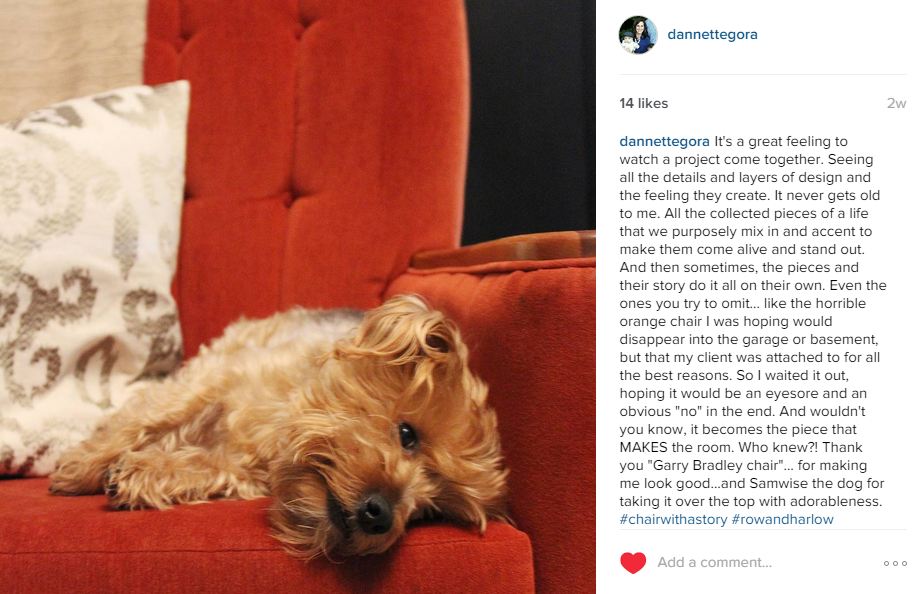


It’s a great feeling to watch a project come together. Seeing all the details and …
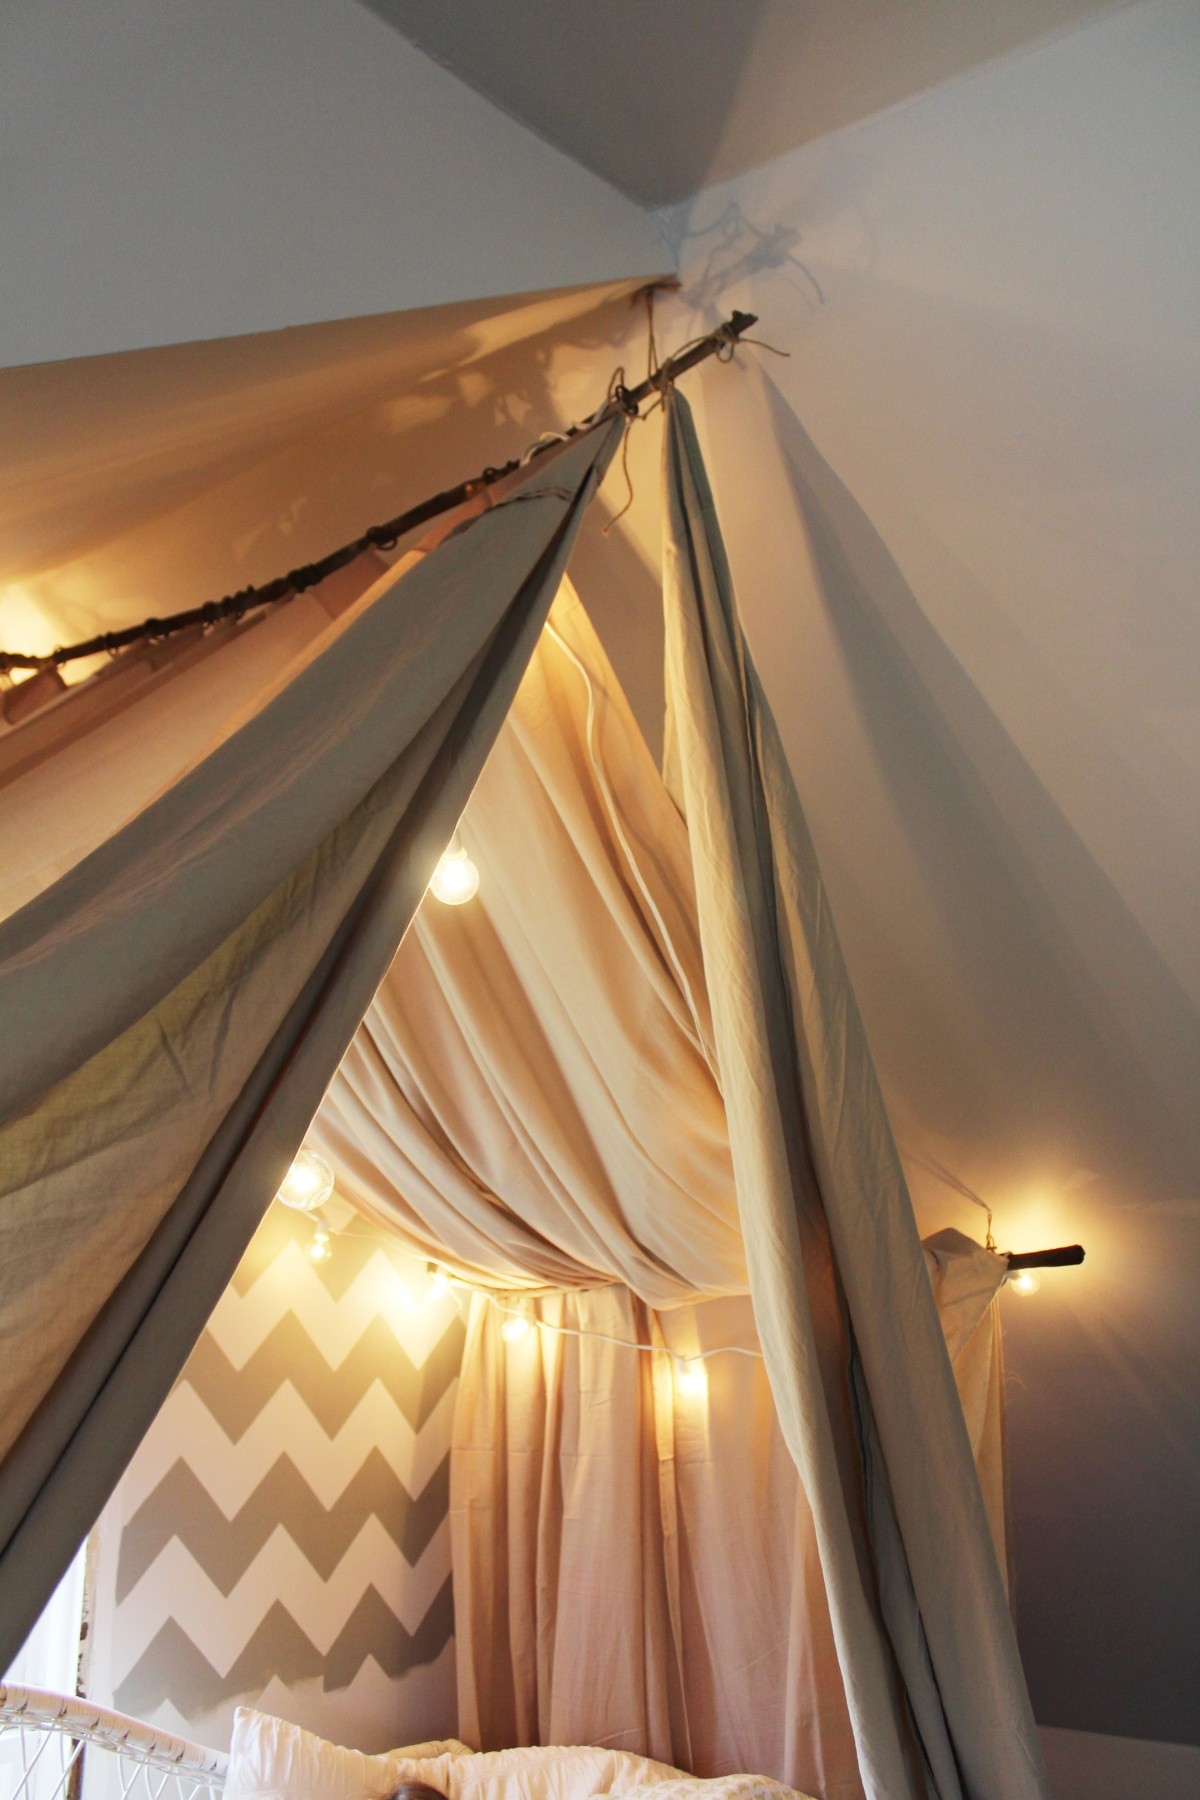
A few months ago I was helping my daughter dream up ideas for her room. One thing she kept mentioning was a princess tent. But we had one already, and it was partly broken and awkward and ALWAYS in the way. And I have to confess that one afternoon, when no little eyes were following me around, I secretly chucked that sucker into the trash. It was one of those silent victories you get as a mom…when you sit back and relax and watch the kids search and KNOW they’ll never be able find it 🙂
I knew what I was up against. A tent. They’re fun, and I’m all about letting these little people have some of it. Really. I just prefer tent fun to be had outside. People trip over them in the middle of the night and it’s no fun landing on dolls and combs and laptops and dishes when you’re least expecting it. Seriously. They pack them full, and shortly after, abandon ship…never to return.
So we came up with the idea to make a tent out of her bed. We shopped online for canopies at Lands End and Pottery Barn and Restoration. I’d put them in my cart and could never commit. It just seemed so expensive, even with the holiday sales. And I’m picky, let’s face it. There was always something “off” about each one of them. So as usual, I came up with the bright idea that we’d make our own. That was months ago. And this poor girl of mine has kept asking and asking and asking. So yesterday I took the day off while my little gal was home sick. Which basically means I worked on something around here that I don’t get paid for. At least not in cash. And sometimes those are the best projects. The ones I do on a whim and get paid in HUGS for. 🙂


STEP TWO
Find some hardware. I used these little hooks and twisted them into the drywall ceiling right above where the rod/sticks will hang. I used two per stick, one on each end of the stick.


STEP THREE
Then I found some burlap string or twine I had lying around and strung it thru each ceiling hook and tied a fancy knot.

STEP FOUR
Weave the center stick (preferably the straightest one) thru the curtain rings. I used four sheer curtains and hung two at a time, alternating rings from one curtain to the other. This helped the curtains looked woven together at the top rod. I even drew you a little sketch to explain.


STEP FIVE
Stick the rods/sticks thru the knotted string holes.


STEP SIX
Drape your fabric from the center stick out to the end sticks.

STEP SEVEN
Stop and get some hugs from your happy tent lover.

STEP EIGHT
Grab a sheet or two and hang them on the front. I actually used an old king size sheet I had and cut it in half. Then cut small holes in the sheet and tie them with the burlap string to each rod/stick. I ended up folding the corners of the sheet back over the canopy since our ceiling is sloped. If you were working with a flat ceiling you wouldn’t have to do that.

STEP NINE
String up some lights if you’re feeling crazy!


I made it to my first IF gathering. I’m still meandering thru my thoughts on it all…there’s just so much to unpack. The speakers were raw and real. I felt such a sense of community and sisterhood being there with all of those women. It’s something I haven’t felt quite like that before. \
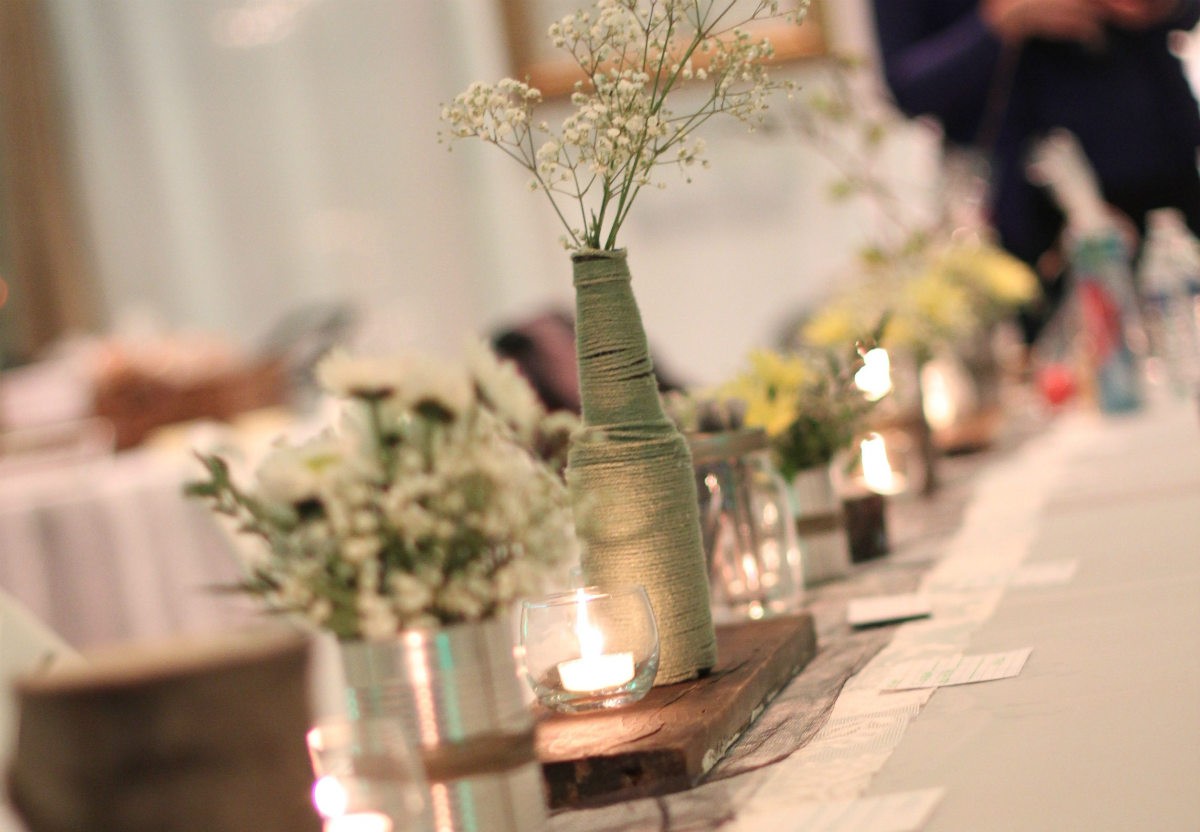
I had the privilege of helping with the decor for the event, and that was a blessing in itself. Months before a friend had asked if I’d be involved. I remember hesitating, feeling unsure of what I could bring to the table…but I’m so glad I stepped up and out of my world of crazy self doubt. We met early on at a coffee shop downtown to talk about her vision. We gobbled down our lunches and chatted and prayed and before I knew it, I couldn’t keep up with my sharpie. When our two hearts and minds came together, ideas just flowed. I was sketching and doodling and designing my little heart away. And I’m not talking about anything grandiose or over the top either. I was working with yarn and cans and sticks…{lol}. I made trips to Good Will for milk glass vases and old frames and used the old lace drapes that were in our house when we moved in. We did buy a bolt of burlap and A LOT of babys breath. But other than that, we didn’t break the bank on decorations.

We prayed about it a lot along the way…from our first meeting to the last moments of set up. That whatever we did and however we did it…that God would be glorified. {and oh did we mean it}. We wanted God to be in it. For women to come and be blessed and feel comfortable enough to pour out their hearts to God. Not like they were at a church or a luncheon or a function {and no offense to any of those fabulous ways to commune with God either}. We were just dreaming of something else for this thing. We wanted it to be an intimate atmosphere that whispered acceptance and grace. I’m not sure how decor in any way shape or form can do that…but I truly believe that when God is “in” something…when He shows up…it can come alive. And OH DID IT. Thank.you.Lord.
***
***
Here was the beginnings of our string art sign. It was sort of the basis of the our whole design concept. Lyndseye’s handy hubby built the pallet substrate for us. You can see my little helper there in the corner. He wanted to rip the paper and eat the nails. Eventually he ended up in baby jail. {aka the jumper}

I made a template on the computer so that I wouldn’t have to measure out the nail locations. I didn’t have time for that, and this sign was pretty big as it was. I’ve discovered that when I work, it has to be quick. Like lighting fast. The little people require snacks and hugs and tickles every 15 minutes. So sending a drawing to the local print place is just easier for me. It might be because I spent years in a design firm and that’s the language I speak. However you slice it, this little template made nailing my 3 foot “I” and “F” cake.

This next image might help you understand WHY I can only work in 15 minutes increments. This is what my 4 year old did while I nailed the pattern down. I was working on project IF, he was working on project TENT DISASTER. You can see he’s in mid jump here. Probably testing out the strength of his tent roof. {sigh…}


I tore the paper off after all the nails were in. It probably took me an hour to do the nails and the yarn. Easy peasey.

My dad even joined in on the action. He followed me thru our woods one cold afternoon and heave-hoed all the down branches and logs that fit the size and shape of my liking {what a sweet dad}. Then he even pulled out the saw and cut them in random lengths for me. I truly heart him.


I also got a little crazy and cut up old lace curtains and used them for table runners. Our original idea was to use chicken wire as a layer over the lace {it looked AMAZING) but it was just too hard to work with in the end. It wouldn’t lay flat and I didn’t have the patience to deal with all the sharp edges. We ended up layering a strip of black tule over the lace to get the same contrasting effect. Much easier, and still pretty I guess.
This “angel” puzzle was in one of the old frames I bought from Good Will … I thought it was fitting that it ended up being the straight edge I used to cut the lace against. God was in the details, like literally. But we knew that with or without an angel straight edge 🙂


I also made two large coffee filter wreaths. I decided to dye the coffee filters light gray by soaking them in a mixture of water and black paint for a few minutes. We laid them out on tables in front of space heaters to dry. Like I always say…whatever works, people! It was somewhat time consuming gluing them all together, but mainly because I was sort of OCD about bunching them together as close as possible. I used over 1000 coffee filters in the end. Thank goodness Aldi sells them cheap!

My son Rigby wanted to be in the photo below since he helped. He stayed up late one night with me separating all the filters. I heart him too 🙂 Who asks to be in a photo and then refuses to look at the camera??? I think I better pause here and apologize for jumping back and forth between serious design and sarcasm. Please know it cannot be helped. 😉

Since we wanted to atmosphere to be cozy and intimate, we surrounded the tables with walls of pipe and drape, basically pulling the walls of our sanctuary in. And by “we” I mean Tom…the amazing facilities guy at our church. He offered up a lot of suggestions and really helped us get everything just right.
We also used long runs of tables end to end so that it had more of a community feel. I think it helped us feel like we were all part of this thing together. Quaint and cozy, and well, just plain lovely.

And we can’t forget this little man. I know he was helping his Momma behind the scenes as well 🙂

And here she is…Miss Lyndsye…our IF coordinator extraordinaire! We had so much fun working together on this. Seriously. I swear we were finishing each other’s sentences by the end. We even accidentally wore matching shirts to set up…”twinning” as Lyn put it. So fun!


***
And finally we were ready for IF:Valpo
***


(photo credits to Liz Bradley and Jerry Grafton)