Showing: 19 - 21 of 21 RESULTS

diy burlap ottoman

ottomans

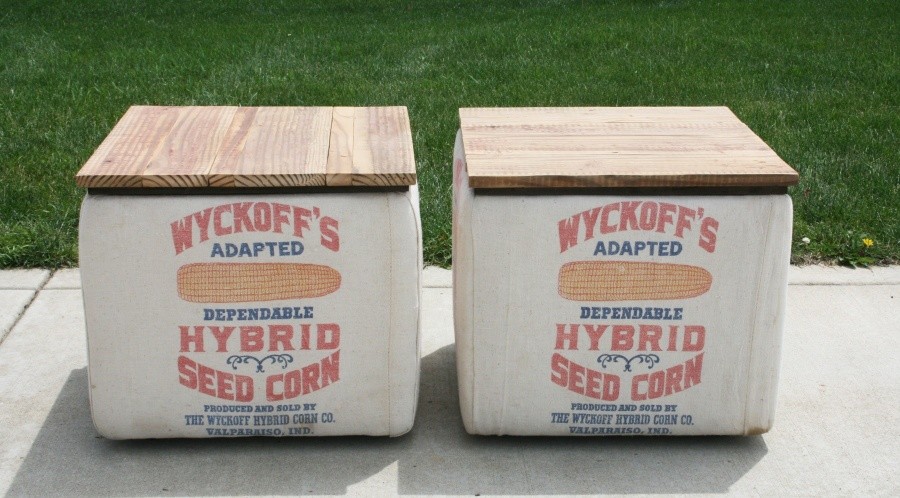
My best friend and I were google searching like mad for a couple square ottomans for her living room. She wanted something unique, somewhat rustic and since she has 6 kiddos, it had to be durable. We also didn’t want to break the bank. As you can imagine, it was a hard find.

After some searching we got a little obsessed with burlap…

and in the end decided to make something ourselves out of the burlap seed sacks from her husband’s farm. They might be a little overbuilt (very heavy)…but at least her little ones can’t move them all of the place!

This was the beginning sketch;it ended up varying slightly as the design progressed.

It’s basically an mdf box with little rubber furniture feet from Home Depot.

I bought some 1″ upholstery foam and glued it to the outside of the box.

We found the cleanest used seed bags we could and cut them into strips a little wider than each side. Then folded the edges, glued them and stapled the fabric on the inside top edge and along the bottom.

For the top, we cut up some old wood from their barn.

We did end up making these storage ottomans…so the tops are removeable.

diy burlap wreath

We were recently introduced to burlap wreaths!  And fell in love immediately of course.  I decided to make a holiday gift project out of our new discovery and just finished making NINE as Christmas gifts for family and friends.  I made sure to hand them out at Thanksgiving so everyone could display them during the holidays.

It only took about two evenings to complete.  And by two evenings, what I really mean is that I worked on them on my living room floor while toddlers excitedly rummaged thru all of my supplies and did their best to “help”.  By the end my four year daughter was arranging her own clusters of beads, tilting her head and saying…this looks beautiful, right Mommy?  It was actually a delightful evening or two!

I decided there are enough tutorials on “how to make a burlap wreath” out there…so why crowd blogspace with my own rendition of exactly the same directions.

Here’s the blog I used:

http://www.lifeonmarsblog.net/2012/03/easy-burlap-wreath.html

I varied it a little during my mass production though.  I was using burlap twine and hot glue by the end to adhere my embellishments…the wire just wasn’t working for me 🙂

Here are some photos of row + harlow wreaths…

diy beaded chandelier

We were recently searching for an inexpensive / easy to transport / chic chandelier for a friend’s out of town wedding…and as you can imagine there wasn’t a lot to choose from.  The bride wanted a fixture to bring an ambience to their barn reception…not necessarily using it as “light” but more as a design element within the space.  Finally, about 5 days before the wedding, we decided to just make our own!

We did some internet research on do it yourself chandeliers and eventually decided upon a beaded chandelier (see link below).  We quickly headed to our local Lowes for a hanging wire basket and spray paint, and also to the local dollar store for an insane quantity of beaded necklaces.

If you try to make your own, I highly recommend purchasing necklaces close to the color you are spray painting.  For our chandelier, we wanted it to be a mix of off-white and khaki, so we used silver and gold colored necklaces.  This will save you time in the end…you won’t need to paint coat upon coat for coverage.

http://dollarstorecrafts.com/2010/05/make-a-beaded-chandelier/

image from tutorial…fun color!

We’re considering repainting our chandelier to a bright color now that the wedding is over and we don’t need it to be white anymore…maybe a bright yellow or blue like in the image shown above.  Here are some shots of the one we made…we’ll post the pictures from the wedding photographer once we have them [udpated photo below]!


final installation